.:[Double Click To][Close]:.
Get paid To Promote 
at any Location


Showing posts with label nursery. Show all posts

Wednesday, September 15, 2010

Antique Addition

This baby blue side table is:
A. A functional piece of furniture
B. A great place to rest a lamp, a book, or a hot cup of tea
C. The perfect ladder for a climbing toddler.


If you said "All of the above", you'd be correct. This is the side table we currently have in Chloe's room. When we are upstairs, we close the baby gate at the top of the stairs and leave Chloe free to explore the bedrooms and hallway. The side table unfortunately is not baby-proofed... it only took one time for me to find Chloe standing up on the second step, reaching for the bed, to realize that it needed to be replaced.

Luckily, after a day of apple picking, we decided to scoot over and catch the last two hours of the famous Christie Antique Fair. I'm so glad we did because we managed to find this little table and chair.


Its the perfect size; doesn't take up too much space and doesn't impede the door swing. I like the curvy top too and the ring-like details on the legs. I also love the colour of it... its been refinished in a nice medium tone stain (it looks a bit orange in some of these photos, but its more of a warm brown colour). But therein lies the problem - do I paint it or keep it as is?


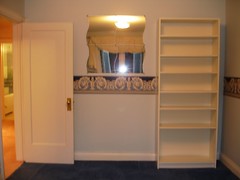
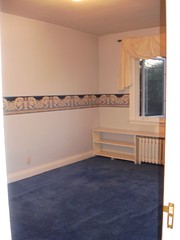
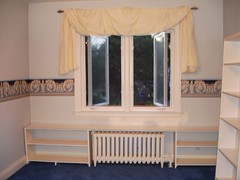
It doesn't match anything else in the room, which is all white painted furniture, yellow walls, and a light maple dresser, and looks like this:


But I'm kinda liking the warm dark contrast. Its such a nice piece too, not cracked or worn, that I'm hesitant to paint it. But then again, I could do it in a nice French grey, that would work with the striped headboard...? What do you think - paint or not?

Whatever the finish, I definitely won't be keeping the chair there. The little one already has a mischievous look on her face and is eying the chair like its the next Mt. Everest to be tackled!

Monday, May 24, 2010

Bedroom Bunting

The paper bunting from Chloe's birthday party has found a new home.


Chloe loves looking up at the banners when she's lying on the change table... which is good because the girl is a major squirmer these days so I need distractions galore!


HandyMan:  "When we're done with the banner, we can donate it to charity"
Wanderluster:  "Okay"
HandyMan:  "It'll be Good Will Bunting"


Ba-dump-dum!!

Wednesday, September 23, 2009

letterlicious

alphabet by bookhou

Ooh, I love typography. This would be perfect in a nursery, right Kathleen?

Tuesday, August 11, 2009

Want vs Need

Most times when we buy things for the house, HandyMan and I weigh if its a "want" or a "need". We don't want to accumulate too much stuff and for the most part, we're pretty good at filling our home with things that fill both criteria. Rarely do we buy something just because of its aesthetic beauty, just because we have to have to have to have it.

Well, sometimes you just have to give in to that urge. We bought this totally-cute-but-totally-unnecessary hot air balloon for Chloe's room. For now, it sits hanging from the window shelf where Chloe can watch it as a soft breeze sets it swaying to and fro. Yes, I know that it will be many years before my little one can appreciate the prettiness of this thing. But sometimes mom and dad have to be a little indulgent ;o).

We found the balloon at the cuuuutest store, Little Lola. The store focuses on vintage toys and natural organic and wooden products. Its worth a visit if you're looking for unique and meaningful gifts for children.

Sunday, July 26, 2009

Rad Rad


And the room is done :) When you're renovating, is there a phrase any more satisfying than that one? I think not.

HandyMan installed the Octoperf wood mesh on the radiator cover. The design which you guys suggested looks perfect. We did have a bit of a trouble though... because we didn't make the three squares the same size! Oops. But I assured HandyMan you couldn't tell the difference at all ;) So that's it, the last piece of the room complete. Finito. Over and out :)


______________________________

If you like how Chloe's room turned out, I'd appreciate your vote in the Share Your Style contest.
One winner out of the top 10 will win a boatload of Benjamin Moore paint (oh what we could do with the master bedroom and living room!) among other prizes.

It's the last week of voting and every vote helps. Click the "Vote For It!" button here. You'll need to register your email address but you are entered to win a prize just for voting too :) Thanks so much!!

Monday, July 13, 2009

Cover Up

Still working on a few bits and pieces to finish up Chloe's room. We've been pondering how to finish off the radiator cover for a while now. We considered metal mesh at first but the edges are sharp and Chloe may be poking her little fingers into those holes. Another option was thin wood strips, maybe 1.5" wide. This would work but its a bit labour intensive to to cut prime and paint all those strips so we kept looking. Then HandyMan found this product, Octoperf, which is a perforated wood product. It can be painted, stained, and easily cut. Just what we're looking for! It also comes in large sheets which is great because we'd order enough to finish all the other radiator covers around the house.

Here are some samples of the designs available. HandyMan put a coat of primer on so we could see how they would look in the window seat. All we have to do is pick a design. Which one do you like?

Wednesday, June 24, 2009

Shelved

With the new baby, not much renovating has been going on around Rambling Renovators. And the projects we do get to are taking soooo much longer to finish. I'm sure you parents out there can relate! So I'm really happy reveal something we managed to complete - the shelf in Chloe's room.

When I designed the whole built-in wardrobe / window seat area, I knew I wanted a shelf above the window. You can always use more storage in a kid's room and plus we didn't have anywhere to put the toys and books that Chloe would accumulate. HandyMan started by cutting a piece of plywood to fit the length of the window. By resting and screwing it into the top of the window frame, we'd have enough support along the length of the shelf for the baskets. The shelf was made 13" deep, deep enough for the baskets but not so deep that it would create a dark hole above the window and block off some of the sunlight. The variety in depth against the adjoining wardrobes also created a much more interesting design.


HandyMan added a 3" strip of plywood across the front to mimic the shaker details in the window seat. A small one inch strip was added underneath the left and right ends of the shelf to provide additional support. We found a nice chrome curtain rod at West Elm and mounted that directly to the face of the window frame. The curtains our seamstress made looked great hanging off the shiny rings. Now its the perfect inviting space. I can picture Chloe sitting there when she's older, reading her favourite book.


One little faux pas though... the curtains were made before we knew where the curtain rod would be hung and our measurements were wrong. Not a big deal, we'll just have to get them shortened. Just one more thing to add to the project list!

Tuesday, April 28, 2009

Soft Spot

I've been spending a lot of time lately in Chloe's room. It really is the nicest room in the house...dreamy yellow walls, plush carpet underfoot, and now - soft, soothing spaces to lounge on.


Gail the seamstress
did a fab job on the bench cushion, curtains and accent pillows. The cushion is covered in a subtle diamond and gingham print. It coordinates nicely with the swirly pattern of the curtain in shades of taupe, cream, and yellow. I figured that the bench cushion and curtains would be long-lasting (while some of the accent fabrics could change over time), so kept them fairly neutral. The slight sheen of the curtain adds a touch of luxury to the space - and the dim-out lining makes the curtain highly functional for a baby's room. We haven't installed the shelf above the window nor the curtain rod so for now, we just 'mocked up' the curtains and have the curtain hooks resting on the top of the window casing. Getting this room completely finished is a bit slow going these days ;)


My favourite fabric though is the pattern on the glider. Its bold, fun, and graphic. The pattern will help hide and stains or spills that are bound to appear when there's a baby around :) And boy, is it comfy! Chloe seems to like it too and falls quickly asleep as we rock away.


We had some bolster cushions and an accent pillow made with the leftover fabrics. Repeating fabrics and using them in various areas in a room really helps to create a cohesive, finished look. I think rooms feel best, feel more complete, when there are fabrics used. I'm surprised too at how many different fabrics and patterns you can use in a room. I worried that with all the polka dots, stripes, swirls, and other graphics Chloe's room would look a bit of a
jumbled mess. But luckily it doesn't. It looks and feels just right :)


Gotta run now... there's a little girl who's asking to be rocked to sleep.

Monday, April 13, 2009

Baby Is On The Way!

24 hours...that's how long my doctor told me I likely have before I'm in the throes of labour. And that was at my appointment 10:00am this morning so if we do the math people...yes, Baby HandyLuster is likely on his or her way :) All signs point to Go. I've had some symptoms of impending labour - things have dropped, things have loosened, and things are starting to feel really really really uncomfortable :o\ And if the experience of my mom and sister with childbirth are any indication - things are gonna happen really really really fast!!

So, this is probably my last post before we (cross my fingers) become a family of three. What a strange, surreal thought. Time to show you all the room Baby will be coming home to. Its not quite done... the banquette cushion, curtains, and glider fabric won't be done until Wednesday. And we haven't figured out the radiator mesh or the shelf above the window yet. But its good for now. We'll be co-sleeping in the beginning, with baby's crib in
our room. That explains why this doesn't look like your typical nursery. Instead, it'll be our calming escape room. A room for Grandma Wanderluster to stay the next few weeks as she helps me learn the ropes as a new mom. A room for HandyMan for when he just needs a full night's sleep and mommy and baby aren't letting him have one ;) A room for me and baby where we can lie on the bed, window open, breeze blowing, birds chirping outside... and I can just sit there and look in amazement at this tiny little thing that came out of me. How wonderful is that :)

The room before...


And the room after...


You can see the Ikea Pax wardrobes we made to look like built-ins. The baskets will eventually sit on a shelf above the window and the banquette will be a comfy spot with curtains, pillows, and cushion. The wardrobe on the left houses linens and the one on the right has baby's clothes. I've put some stickers on the drawers to help keep things organized.


A few of my favourite details around the room...


I especially love the picture ledges and the art wall. On the ledges, we have some of HandyMan's childhood books, a painting I did, a photo of the Eiffel tower taken on our honeymoon, and a moon and star handmade by baby's Aunt Kim and Uncle Kevin. I love personal touches in a room. And if you look closely, you can see some of the potential names we've picked out for baby ;)


On the art wall, you can see the Catherine Ledner armadillo print, my favourite little painting of a nightie and stockings on a clothesline by Alison MacKenna, and some etsy prints by munieca and mariajanosko.


And that's the baby's room. All we need now is baby :)