.:[Double Click To][Close]:.
Get paid To Promote 
at any Location


Wednesday, April 30, 2008

White Kitchens

I continue my love affair with white kitchens (and judging by my Google stats, there are many of you who find them just as lovely!). Here's more beautiful pics...hope they provide some inspiration.

From L to R: Nathan Egan, Domino gallery, cottageliving, kitchenbathgallery, Sarah's House, source unknown, viller56, House Beautiful.

I Love Chairs

So I needed this... my latest etsy purchase from mariajanosko.

Monday, April 28, 2008

Episode 4: Handy Is As Handy Does

Much progress has been made in Casa Wanderluster though looking at the room, there doesn't seem to be much different. HandyMan proved once again just how handy he is...I think he surprised himself at how much he was able to accomplish on his own! Over the last two weekends, HandyMan has re-routed the cable and telephone lines, braced the pipes, fixed the sagging joist, built the new wall frame, AND drilled a new hole in the brick and moved the vent. His arms shook for the whole next day after that last task. Here's some pics of our progress. With the hard work done, we've got to finish up just a few last things on the To Do list before drywall next week.


Then... we sit... for two months. Unfortunately, that's how long the cabinets are going to take to come in. Measurements couldn't happen until the old kitchen was out and the new wall frame was in. Its all good though. We went to the showroom last weekend and I am in love with the cabinets. I didn't realize that we had a choice between their tandem drawer with MDF construction and metal hardware, or the all wood drawer with dovetail joints. We went all wood :) It will be worth the wait.

Okay, we won't really sit - we'll use the next two months to work on the deck and the front entry. I had a spurt of energy yesterday and went at the front door. I took off the storm door, stripped the frame down to the original casing, sanded everything and with HandyMan's help, put up some new wood strips to hide the old ugly frame. Here's some Before & Afters. I think it looks better already. I'm hoping to start the exterior painting while HandyMan finishes up in the kitchen. There is light at the end of the tunnel!

Saturday, April 26, 2008

Our First House

A few weeks before HandyMan and I became Mr. and Mrs. HandyMan, we built our first house together. Now this feat isn't amazing as it seems... when you consider the house was only about 3' long and 1.5' high.

HandyMan and I got married on a beautiful summer's day, 8 months ago today to be exact. I like to think our wedding was personal and reflective of us as a couple. We did a lot of 'DIY' touches but my absolute favourite was our "card house". I wanted something unique to hold the cards from our guests (I'm just not a satin poofy box kind-o-gal) and thought what better than a miniature house designed and crafted by me and my guy.

We started with the concept... modern, clean lines, with a 'drop slot' and removable lid. I also wanted glass (glass?!) and a staircase (yes, I guess I could be a demanding bridezilla!). Think Barbie's contemporary dream house :) HandyMan drew up the plan and over a few weekends, bass wood and plexiglass in hand, we built our first house in the model room at HandyMan's office. Here's a look...


Today, the house sits in our basement, filled with cards and menus and placecards and other wedding ephemera. We plan to display it in our new home; we just have to find the perfect spot for it. It is more than just a house after all - you could really say that it was the house that love built :)

Wednesday, April 23, 2008

The Great Outdoors

We're experiencing a bit of an early summer here in Toronto. Temperatures over the last few days have hovered at a high of around 22 degrees celsius (about 76 degrees farhenheit). That means that everything outside is coming alive... our forsythia is blooming a brilliant yellow, the crocuses and daffodils are coming out, and our lawn is slowly turning from brownish to green. With all this colour and sunshine about, its making the front facade look even more worn, boring, and just plain blah.

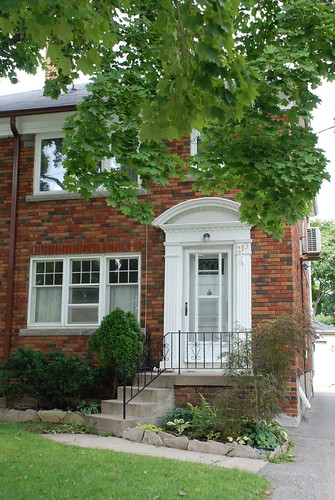
Living in a neighbourhood with row upon row of the same red brick semi-detached houses, HandyMan and I want to put a little bit of effort in making our house stand out. We've scoped out "the competition" and noticed that (a) most people do not paint their window and door trims preferring to keep them white; (b) there is a preference for painting the door black; and (c) house numbers and light fixtures tend to be in a black finish and very traditional in style. Likely branded as the neighbourhood rebels (that reputation gained because we're the only as-yet childless couple on a street with 44 kids - that's about two per house!), you just know we're running in the opposite direction from convention.


So what to do... we want a more contemporary look for the front facade. Think brushed metals, good lighting, a minimalist garden.


We've ordered these pretty fab modern house numbers from WestOn Letters. To go with it, I'm currently on the hunt for a new light sconce. Seeing as there is only about 11" from the underside of the dentil moulding and the top of the screen door, I'm limited to fairly small and compact fixtures.
This Lakeland LED sconce is the top contender. The brushed nickel finish will look great with the red brick. Ooh, and I want a custom balustrade too. Something like this one.

But this is where I get stuck... I've picked out the accessories but am having difficulty on the paint colour. Any suggestions for the colour of the trim and door? The screen door will be replaced by a much simpler, single glass paned one, in the same colour as the door.

Tuesday, April 22, 2008

House & Home

Canadian House & Home magazine is my favourite home decor mag. Its always filled with inspiring pictures and informative articles. Less on the DIY/eclectic look (say what Domino features), the magazine is probably more "aspirational"; most homes featured are on the high end with big budgets. It definitely offers some nice decor eye candy though :) They've recently launched a digital edition. You can take a peek here.

Monday, April 21, 2008

Kitchen Pendant

Good progress on the kitchen this week. Mike (the amazing electrical guy) worked all weekend to put in the new plugs, rid the kitchen of some old knob and tube we discovered, and hang up the pots. He even found some time to put new plugs in the upstairs office and guest bedroom and hook up the timer on the garage lights. If any readers in the GTA need a great electrician who is reliable, thorough, and efficient, I’ll hook you up!

So speaking of electrical, HandyMan and I scoped out lighting for the pendant in the kitchen. We’re going for a ‘bistro’ look so here were some of the options (all lights from Union Lighting).


So what did we end up getting?? You’ll have to wait for the finished kitchen to find out!

A Day in the Life - 21.04.08

Sex
"If you can't get into Love", check out its "downscale sibling", where the fare is "sometimes sub-par" but "service is way faster". Devotees say the "cheap but addictive" menu really "hits the spot" while dissenters warn that "satisfaction is not guaranteed". The establishment's cleanliness is "several blocks from Godliness", they say, and wonder if "a call to the Board of Health may not be in order". But even the most sceptical admit that "as empty calories go, these dishes totally rock".

So it turns out the Yale student who said she impregnated herself only to abort her embryos using "herbal" methods several times over for an art project, totally pulled one over on everyone. She didn't really get pregnant a bunch of times, and she didn't really give herself abortions. According to a statement the entire stunt — Shvarts' press release, visual presentation, and narrative materials — was all part of Shvarts' real art project: Proving people are gullible weenies.

His “Aliza Shvarts” pendant is all a-swirl with red - reminiscent of roses, cherries jubilee, and miscarried baby brain juice - and retails for $45.00. Chains are not included, but we think this would look absolutely lovely paired with faux-Native American leather fringe boots and leopard-print culottes.

As Pugh puts it, "I think there will always be a need, or want, within fashion to escape into another world, and if it's a universe where women can fly and men release fire balls from the palms of their hands, then so be it!"

But his life was over, he was part-disembowelled and then torn apart with his arms and legs tied to motorbikes, the remains put on display as a warning to others against defying Taliban orders to stop educating girls.

The researchers say that pollution is dramatically cutting the distance travelled by the scent of flowers. "Scent molecules produced by flowers in a less polluted environment could travel for roughly 1,000 to 1,200 metres. But today they may travel only 200 to 300 metres. This makes it increasingly difficult for bees and other insects to locate the flowers."

“We lost the war — not because we were outfought, but because we were out Psyoped,” he wrote. He urged a radically new approach to psychological operations in future wars — taking aim at not just foreign adversaries but domestic audiences, too. He called his approach “MindWar” — using network TV and radio to “strengthen our national will to victory.”

Sunday, April 20, 2008

Round 'Em Up

We're on week two of our ten-week kitchen renovation. And while we have a workable temporary kitchen set up, the novelty of running up and down the stairs between the kitchen in the basement and the refrigerator which sits in the dining room is getting old - really fast. But once the reno is over, we'll have to get rid of the old fridge. Lucky for us, we won't have to do any heavy lifting, thanks to The Great Refrigerator Roundup.

This program, run by the province of Ontario, aims to remove older, inefficient fridges and freezers from the electricity system. So not only do we get our trash taken out for free, get electricity savings, but we also ensure that these appliance relics aren't resold and put back into the market wasting energy. Sweet. In the meantime, I'll just waste my energy running up and down the stairs...

Friday, April 18, 2008

Sunshine

Lots of sunny days ahead. Time to get outside!

(image via Absolutely Beautiful Things)

Wednesday, April 16, 2008

Feeling Inspired

I have a new toy. As you may have noticed, I love to put together "inspiration boards". These boards are a good way to convey the mood and look I want to create for a room. I've done a few for the guest bedroom, deck, and kitchen. Typically, I'd cut and paste pics I found around the internet and plonk them into powerpoint to create an image. Well, I've discovered a new tool that helps me create boards much more easily.

Polyvore.com is a "unique, easy-to-use web-based application for mixing and matching products from any online store". That it is, and more! Call it 'virtual collaging'. Remember when you were in Grade 3 and you had to put together a collage using pictures cut out from magazines? This is the same thing for the Internet generation. Once you put together your collage or "set", you can share it online with others. And if you want to purchase the products you put in your set, easy-peasy, Polyvore saves the link back to the original store where you got the pic.

The best thing about the site is that you can easily create different variations of one look. Here's a few looks I've put together for the kitchen...the yellow kitchen:


The silver kitchen...


And the black and white kitchen...


How fun is that! And if you still can't get enough of internet tools, check out my old post on Google Notebook. You'll never leave your computer again, lol.

Monday, April 14, 2008

Episode 3: Watch Your Step!


Yes, that is HandyMan's head...through the ceiling... the ceiling of my basement...below my kitchen which we are renovating. But before we get to how this happened, I'll bring you up to speed on some of the progress we made this weekend.

We ended the last episode with the kitchen ripped out down to the studs and the subfloor gone. HandyMan and I started the day debating how to handle a few little issues. First up, the sagging floor. After purchasing a 4' level (my new favourite gadget) and ripping out a few floorboards, we were happy to discover that that the dip in the floor was caused by just one problematic joist. Seems that the previous owners had tried to fix the problem by sistering or doubling the joist. The sistered joist was an old 2x4 - back when 2x4's really were 2x4's - insufficient really to support the 2x10 joist. We would do the same, ripping out the old sistered joist and putting in a new heftier one.


All was good and the new joist was secure and level. We even left a little message on the joist and I commemorated the occasion by taking a pic...which is when HandyMan took a step back to get out of the shot and ended up with his right leg crashing down through the subfloorless floor and through the ceiling of the basement! Good thing he didn't tumble all the way through otherwise the temporary kitchen in the basement would have been demolished too :o\ Luckily, the only thing bruised was HandyMan's ego. With a few more hours work, we patched the subfloor with some 3/4" plywood and ended the day with a nice, level floor.


Next up, HandyMan had to build a new stud wall on the exterior wall. This would allow for new insulation (very much needed - our cooking oils used to coagulate when stored in the kitchen cabinets!) and a vapour barrier. The only problem was that the pipes beneath the window were in the way. As the sink was not going to move, the pipes would either have to sit within the new wall and then poke out into the back of the cabinet OR poke up from the floor and come up into the bottom of the new sink cabinet base. The pipe was cast iron but 'newer' copper fittings had already been soldered on so HandyMan was hesitant to cut down to the cast iron in order to move the pipe forward into the floor space. That meant he instead had to get the pipes to fit in the wall. With no help from me, HandyMan built the new wall lickity-split, framing around the pipes. He'll have to put some sort of brace to hold the copper pipes back and then attach elbow joints so that they'll poke out into the back of the base cabinet.


Surprisingly, we're on track with our schedule. Measuring for the cabinets is on Thursday, electrical will be in next weekend followed by drywall - goodbye stud wall. Then there'll be no more opportunity for HandyMan to crash through anything!

Friday, April 11, 2008

Aya want a nice kitchen

As it turns out, we won’t be going with the Lowe’s cabinets after all. Our electrical quote came in much lower than expected, the bin rental was also lower than our estimate, which meant getting the Aya Kitchen was back in consideration. We did flipflop on this one… Aya doors looked and felt nicer, had nice hardware, but the upgraded Lowes cabinets were plywood construction with dovetail joints. Lowes was also cheaper but we’d have to take care of the extras (like glass doors) whereas Aya was all in one and the price difference now wasn't that great. Seeing the great Aya kitchen at Junebug & Frisco’s place helped seal the deal. In the end, we decided to go with the Aya.

So here is the revised kitchen plan which is a little different from the Ikea plan mockup I put together. Let’s take a tour.


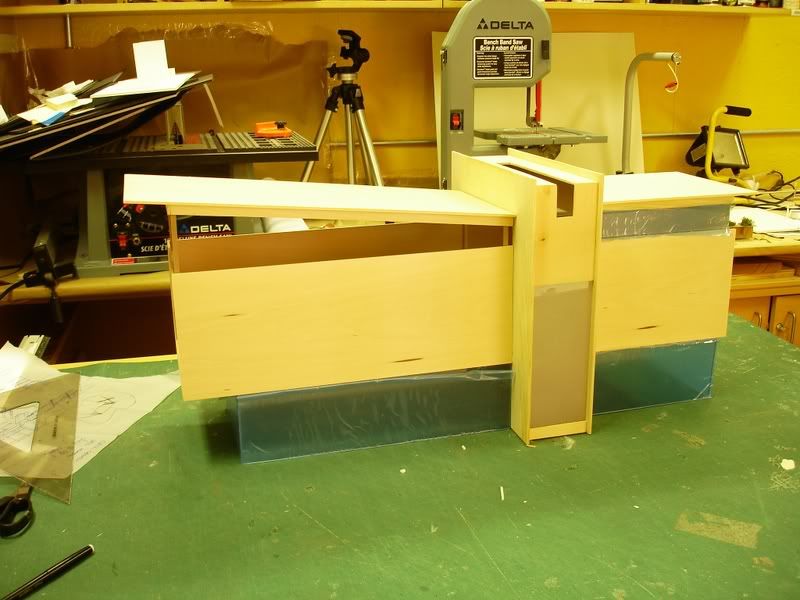
This is the west kitchen wall. The leftmost cabinets are the new workstation. We used to have a narrow pantry there but two days ago, but thanks to HandyMan’s handy skills, that is now gone and this new space is framed in. We’ll put cookbooks in the open shelf along with an iPod docking station with wireless speakers. We’re not big audiophiles and figure we can just move the speakers from the kitchen to the living room if needed. Below the uppers, we’ll have a wall-mounted flat screen TV on an articulating arm. The lower cabinets will house the bigger appliances – KitchenAid stand mixer, blender, George Forman grill etc. To the left of this workstation, on the wall leading down the hallway, we’ll be putting a full-length chalkboard. It’ll be framed out in the same Shaker style as the cabinets and will have a strip of hooks mounted on top to hold keys (the side entrance enters right near this chalkboard). I really wanted to have a hidden cabinet behind the chalkboard, but the studs are too close together at that point, so this is the best solution.

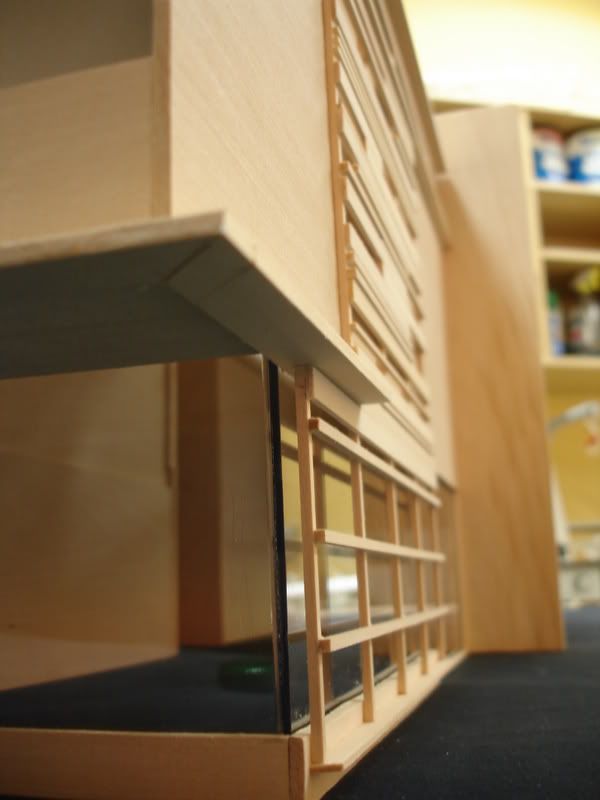
The doorway leads into the dining room. To the right of the doorway, we have storage galore. Lots of deep pot drawers and uppers! Around the range, we’ve got a pull-out spice rack on the left and narrow cabinet for cookie sheets on the right. Since the stove is being moved from the other wall, HandyMan will have to run the air vent through the ceiling and out to a new hole through the exterior brick. Hole in brick? Yikes! The run of cabinets stop short of the sliding glass doors on the north end of the room. You can see our whole kitchen from the back deck (which really creeps me out sometimes), so I may put some drapes in front of the sliders.


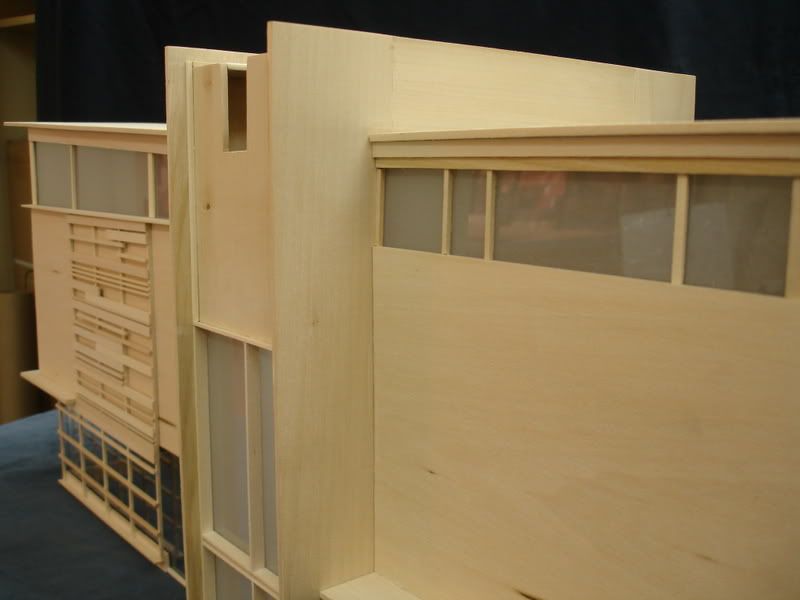
On the east kitchen wall, we’ve got a full-height pantry on the left with a mix of fixed and pull out-shelves. Beside that is the counter-depth French-door fridge. In the base cabinets, we’ve got a pull-out with two metal shelves (to house baking supplies, rice, bulky items etc); dishwasher, a pull-out recycling drawer, and a bank of drawers. If we had put the dishwasher on the right of the sink, we’d have room to widen the metal shelves enough for them to store the KitchenAid… but that would mean the dishwasher was visible from the dining room. Not good. So, we’ll live with this setup and I’ll have to crouch below the workstation to get the KitchenAid for those once-in-a-blue moons when I do some baking. The uppers on either side of the window all have glass fronts and will keep this wall of cabinets from feeling heavy. I’m thinking we paint the back of the cabinets, maybe a pale yellow to tie in with the dining room, and to make my white dishes pop.

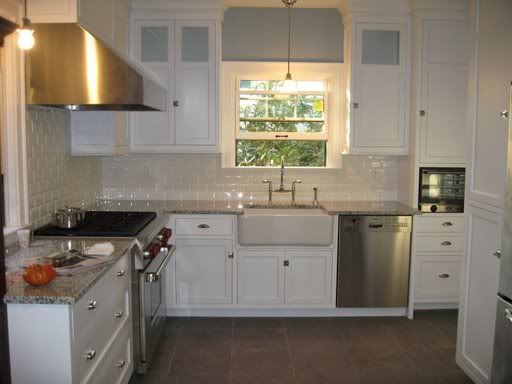
To finish off the room, we’ll have a roman blind shade on the window, a hanging schoolhouse mini-pendant over the sink, 4 recessed pots, and a fresh clean palette of white, grey, touches of yellow, and black. We're pretty happy with the layout of our tiny galley kitchen. Anything we've forgotten?

This Small House

This is the tiniest house in Toronto. Don’t you just want to pick it up and put it in your pocket? At 312 sq ft, the house makes use of some great space-saving techniques... built-ins, using lots of natural light, murphy beds, same materials throughout. You can see more pics on the house’s website.