.:[Double Click To][Close]:.
Get paid To Promote 
at any Location


Showing posts with label tiles. Show all posts

Monday, February 28, 2011

It's Feeling Hot Hot Hot

It's getting hot in here folks - and not just because we've only got six weeks to get the living room done! The electrical will be finished up this Wednesday so for now my ceiling is a mix of pot lights, holes, and hanging wires. It always looks worse before it gets better, right?

HandyMan and I are moving along and purchased the fireplace. So here's the thing about the fireplace... although we loved the old wood burning fireplace, it wasn't going to work for our family. Rocks were literally falling off the front and the hearth was cracked so we would have to replace it. The fireplace, placed on an angle, also took up a huge amount of floorspace so we'd need a smaller unit. Plus, with plans for expanding our family, we knew we didn't want to have a fireplace that was so accessible to wandering little hands.

Where did that leave us? Well, we decided to get one of these:

That's the Skyline fireplace by Marquis. We've decided to place the fireplace flat against the wall (back towards the dining room) to minimize its size. That meant we only had a 48" wall to work with and this particular model fit the size and had a nice tall flame as compared to other similar styles. The idea is to build out a floor-to-ceiling rectangular frame to house the fireplace. We'll add in some details, like tiling right up to the glass edge, and recessing the base and the top to make it appear like it floats and less like a massive thing the room.

I've done a bit of shopping for tile to face the fireplace - and let me tell you, this is no easy task! We want something that blends in a bit and fits with our decor. So no slate, no rustic stone, nothing too dark and heavy. We keep getting drawn to a variation of our kitchen backsplash... some sort of marble mosaic.


Not all of these are fireplace options (I was also shopping for something for the eventual basement bathroom).  I am still unsure though. I haven't been able to find many white marble fireplaces so I'm guessing its not typically used there. And now, I read Carol's take on modern fireplaces and I'm worried we've picked both an ugly fireplace and the wrong tile!!!  Agh. I don't know how to mix a modern fireplace in a traditional home!


Just joking. Sorta. I'm so indicisive about the fireplace... and we don't have much time to figure it out.

Sunday, February 22, 2009

Tile Carpet Triumph!

Is it possible to fall in love with an inanimate object? Because I do. I LOVE THIS TILE FLOOR! The hard texture of the stone and the heat from the radiant heating underneath...its enough to make this pregnant woman swoon.


The bathroom is looking all schmancy - even better than we expected.  The vanity is going back in today.  We picked up the door yesterday and just have to prime and paint it, paint the hinges in a nice matte black, and install the door.  And then, then, we can do a proper bathroom reveal.  I know you've all been waiting patiently for that :)

Sunday, January 11, 2009

Let The Sun Shine In

Here's where we started:


And here's where we're at:


Grouting and fixtures to follow!

Tuesday, December 23, 2008

Schmancy!

Oh my.  The reno gods must be smiling down on us - because the bathroom floor is looking awesome!  Tiler guy got the carrera marble perimeter down.  This bathroom is starting to look all glittery and glossy and shiny and new!!


I'm starting to see the whole vintage modern look coming together :)  The moonstone strips will be laid next forming a border for the 'carpet' but then we'll have to wait for the basketweave insert.  The shipment is expected mid-January... but we're making a trip to the tile shop tomorrow to see a comparable tile with invisible grout lines.  Funny - when the rest of the world is out last-minute Christmas shopping, we're shopping for tiles!

Sunday, November 9, 2008

Bathroom Layout

Ever notice how when you're working on something fun, it doesn't seem like work? That's how HandyMan is with AutoCAD. Task him with drawing something up and he becomes as productive as a spider making its web. He can whip up plans, elevations, and drawings in no time. So when we found the tile for the bathroom walls, he got really excited and came up with myriad options. Which was great, because sometimes having a visual of the end product really helps with the planning.

At first, we thought of having the tile just on the tub walls and put a half wall of beadboard on the other walls. But with the carpet tiles in marble, we thought that would be mixing styles too much. So then we played with the idea of putting tile on two of the four walls... but where to stop? Put the tile only in the shower stall? Run the tile across the top of the door and behind the toilet? Here are some looks:
Okay, looking good so far. And what about the other two walls? It would be easy just to paint them and be done with it. Or we could tile them which would be a little more work. Maybe tile only half the wall to keep from overwhelming the small space...

So many choices! But now seeing it all on paper, we can clearly see the look we want. Here it is:

I love the vintage feel of the room. Using white tiles will help keep the room from feeling too tight and claustrophobic. The band of grey ceramic tiles beneath the cap rail will run around the perimeter of the room and will help tie everything together. As well, we're going to wrap the top and front of the half wall between the tub and toilet with marble, which ties in with the marble tiles on the floor. And the half frosted/half wood door will bring in natural light and brighten up the space.

There's a few things we're not loving (like the front skirt of the tub - would have looked better plain and simple), but at least we've managed to find fixtures to fit in the small space. I'll post pics of what we've picked out so far soon.

Friday, November 7, 2008

Fun with Subway Tile

Though I love renovating - all of the demo, the planning, the decorating, the shopping - one thing that exhausts me is shopping for tile. Tile is a finicky creature. You can't just pick one tile and be done with it. Nooo, sirree. The tile has to mix well with other tiles, its colours working with other colours in the room, and the texture has to fit too. Not to mention that there are more tile options out there than all the toilet, tub, and vanity options put together. Its mind boggling.

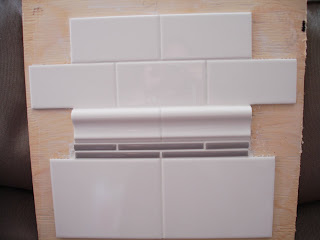
HandyMan and I and found tile for the floor fairly easily but figuring out tile to surround the bathtub was a bit more difficult. Going for a slight vintage look, you'd think classic white subway tile would be the logical choice for the walls. But I'm finding that look - subway tile with maybe a line or two of glass tiles as an accent - very common and a little boring. So taking note of what Sarah Richardson did in her "low" cost bathroom, I decided to mix different sizes of tiles. We lucked out at Lowe's and found a variety of ceramic tiles to create something interesting, yet classic. Here's a little sample board HandyMan put together:


The different sizes create interest, the rail piece adds texture, and the grey bands add colour. Awesome! We're planning to use moonstone 1x6 strips (the same strips we'll use to surround the basketweave tile for the tile carpet) instead of the grey ceramic tiles in the mockup, provided the heights are the same. If not, the grey ceramic bands will work just as well because they are in the same colour family as the moonstone. Best thing: this pattern works out to less than $4/sq ft. Sweet.

So now we have the basic pattern, but how is it going to look laid out? Watch for the next post where HandyMan has pulled out his AutoCAD bag of tricks and created some pretty cool renderings.

Monday, November 3, 2008

Tile This, Tile That

Not much progress on the bathroom reno.  We've had two contractors in and are just waiting for the quotes to come back.  I'm still hoping for a late November start.  By the looks of it, the contractors will have their work done in less than a week.  That leaves ample time for HandyMan to do the tile work after, and still have time to move onto the guest bedroom before the baby arrives.  Speaking of baby, we're at almost 17 weeks and everything is going fairly smoothly (minus the nausea which seems to stick around most of the day :o\ ).

HandyMan came up with a few floor tile options.  We're going with a basketweave tile carpet, not hexagon tiles as shown, but you get the picture.  The toilet will go in the niche at the top right.  If you look closely, you can see the dashed lines which indicate where the new vanity will be placed.

Options 2 and 3 show the carpet off nicely; the tub and carpet line up and will look pleasing visually.  Option 2 has the remaining tile in an offset brick pattern.  With Option 3, the other tiles are in a grid pattern.  Neither of these really appeals to me... the mishmash of grout lines seem chaotic.

Option 1 is what we're planning to go with. Stretching the tile carpet the full length of the room will make the overall space seem bigger.  And since the vanity will have an open slat shelf on the bottom, you'll be able to see through the vanity to the floor.  Keeping the brick pattern of the remaining tiles to just the toilet area will also minimize the visual clutter.  Now all we have to do is tear out the bathroom, move the plumbing, buy the fixtures, buy the tiles, and put everything back in.  Easy as done  :oP

Monday, October 27, 2008

Floored!

HandyMan and I spent the weekend zipping around town in search of bathroom materials.  Tiles, toilets, tubs, vanities... you name it, we saw it.  Mind boggling, it was.  It was worthwhile though.  We got a few things figured out... like, there are only 3 options for a 54" bathtub in all of Toronto.  And that the beautiful chrome deco style vanity I posted a picture of probably won't work for our bathroom.  (Yes, it's lovely but it still leaves us with no storage or counterspace).

In the tile department, we were a little more lucky.  We've decided to do a tile carpet to add some interest.  We found a great basketweave tile from Saltillo in carrera marble and moonstone.  We'll border it with moonstone pieces and then larger marble tiles.  I've always loved tile carpets.  They add texture and have big impact especially in a small space.  The tile will look great peeking out from under the vanity.  Here's some inspiration pics:


Now finding wall tile to go with the schmancy floor tile... that was a bit more difficult.  We found a good option and HandyMan put together a sample board.  More on that in another post!

Monday, September 15, 2008

Looks like icing, tastes like glue

Take a bucketful of fluffy white tile glue...
Add some polished calcutta marble mini tiles...
 

Sift out threads of tile netting...


Mix well using equal parts elbow grease, determination, and HandyMan talent...


Apply carefully...


And let sit for 24 hours.


Grouting to follow!

Monday, June 2, 2008

Episode 7: Beaten... for now

It finally happened. We've been beat by the kitchen. Beat into a sore, bruised, blistered pulp by our little 8x13 kitchen. After two days spent slopping on mortar, inhaling porcelain dust, and installing tile on our hands and knees, the kitchen floor (minus the grout) is finally done. Give a 'yahoo' to the home team :)


The job was harder than we thought. A few unlevel spots had to be fixed using the mortar, and HandyMan had to give me a quick tutorial on the table saw so I could do all the cutting. By the end of it, I was whizzing through those tiles, sparks in my face be damned ;) And HandyMan was laying those tiles down like a pro... look at those awesome straight lines (all done by eye - no spacers - those are for the weak!). As we looked around the room, admiring our handiwork, we couldn't help but smile -- until we realized we had no path to close the open window and lock the back porch door!! Ah well. There's nothing in that empty room to tempt a burglar :)

So now, we rest. We're running off to Prince Edward County for a few days to relax and rejuvenate. We've never been there before so we're looking forward to visiting the many wineries, farms, and quaint restaurants in the area. Hopefully this trip will give us the energy for the tile grouting which follows later this week. We'll be taking a brief blog hiatus, so sit back and enjoy the journey of the kitchen thus far.


Monday, May 26, 2008

Episode 6 1/2: Ditra Down

A mini-post on the progress we made on the kitchen last weekend. After filling the gaps in the floor with levelling cement, we put down a layer of modified thinset and then the Ditra. The Ditra is a membrane which is supposed to help prevent the tiles from cracking. Hopefully it will do its job. Next weekend, we'll apply another layer of thinset and then finally the floor tiles.

Sunday, May 18, 2008

Episode 6: Keeping It Level

We've had a slow start on the flooring. I blame it on Mother Nature... the sun was shining and HandyMan and I were content to run some errands, do some gardening, enjoy some bbq, and mow the lawn. That meant though that we didn't get as much progress on the floor as hoped.

We picked up the tiles from Saltillo. Love that store (and so does Sarah; she almost always uses them for every episode). Love HandyMan's architect discount. Love RONA too. They were having a 15% off sale so we got a deal on the thinset. Not loving the dips in the subfloor. Turns out that the kitchen floor slopes near the threshhold to the dining room. If we left that as is, eventually any tile laid over top would crack. So we had to fix it with some levelling cement... notice I didn't say "self-levelling". Nooo, HandyMan and I figured we were handy enough to level it ourslves and save the $20 bucks. Were we successful? Ask me tomorrow when the cement dries :o\


We managed to figure out the floor pattern though. Initial thoughts were lay it in a 1/3 offset but that just ended up looking weird. We settled on 1/2 offset. Sounds easy right? But then we spent a good hour figuring where to start - center it on the dining room door? Hallway door? Middle of the room? Centered between the cabinets? Yes, that's how we'll do it. Here's a peek.


Tomorrow, two layers of thinset, the Ditra, and the tiles are going down. Wish us luck.

Tuesday, May 13, 2008

Episode 5: Return of the Room

She's baa-aack. The kitchen, that is. Drywall is up and the subfloor is down. Let's take a look at how far we've come.


Ta-da! Yes, I know... there's not that much to look at. But since HandyMan and I did most of this work ourselves, I'm pretty darned pleased. We've finished painting (you can see the sample swatch beside the sliding door frame). Next up: floor tile installation this weekend. Here's a closer look at the palette... an olive taupe porcelain tile, calcutta marble backsplash, kashmir white granite and matte black oval knobs. The reno just keeps chug-chug-chugging along...